| Version 7 (modified by , 7 years ago) ( diff ) |
|---|
Emulator for Next-Generation Smart Grid Network Management Tutorial
This wiki page contains tutorial for: "Software Defined Network Management for Dynamic Smart Grid Traffic".
Description
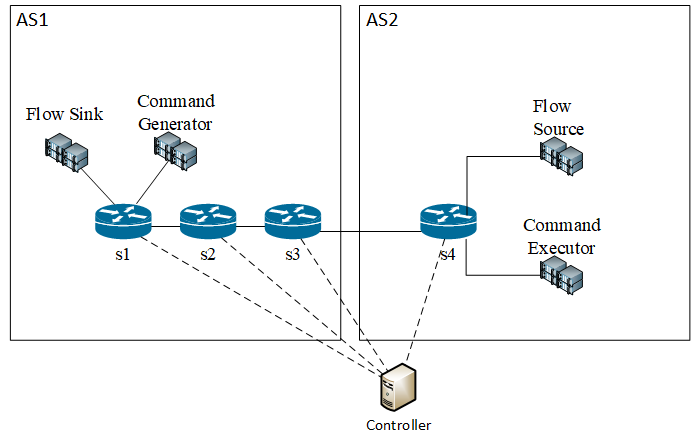
For this tutorial we will use ORBIT SB9 test bed to execute a test with two types of supported flows (stream and command flows) on test topology shown on image below.
Source code for SDN Control Framework and Smart Grid Communication Evaluation Platform is available here.
Environment setup, test execution and results collecting is covered in this tutorial.
Prerequisites
VM that will be used in ORBIT environment should be pre-configured and we suggest using Ubuntu 14.04. There are two approaches for running the SG network emulation:
1. Configure VM manually
Following items should be installed and configured:
- Git, distributed version controll system. Installed by executing:
sudo apt-get install git - Mininet with POX, available at this GitHub page. In short it can be installed with:
./install.sh -a. - Python package management system, pip.Installed by executing:
sudo apt-get install python-pip. - jsonpickle, used for JSON configuration deserialization. Installed using pip:
pip install jsonpickle. - nfdump, needed for Net Flow results parsing. It can be installed using:
sudo apt-get install nfdump. - emulator, provided at following here.
- Configure ssh to allow tunneling by adding following line to
/etc/ssh/sshd_config:PermitTunnel yes
VM that can be used as base and is already available at ORBIT catalog is ubuntu-14-04-64bit-2017-06-09.ndz. These steps can be simplified if prepared VM is saved and reused.
1. Use prepared VM
Use already prepared VM that should be the quickest way. The VM is named sg-comm-emulation.ndz.
Setting up the environment
Setting up the environment is mostly automated. First, time slot at ORBIT should be scheduled. This is explained Getting Started Wiki page. Once the registrations has been approved via email, prepared VM can be loaded onto the SB9 test bed and the machines can be started. Ubuntu 14.04 VM image is available at ORBIT VM catalog.
- Load VM image:
omf load -i <IMAGE NAME> -t all. - Start SB9 nodes:
omf tell -a on -t all.
Once the VM image has been loaded and the nodes are up and running, the only thing left is to exchange ssh authorization keys. This is done by executing following script ~/emulator/environment//setup_ssh.sh ~/nodes.
Provided nodes file contains the list of ORBIT nodes that are up and running and will be used for running mininet nodes. File is provided in attached archive.
Running the experiment
Sample experiment is described in JSON files:
emulator/execution/sample_parameters.json
emulator/execution/sample_topology.json
Test is run by executing SG-CommTestBed.py script on node1-1: sudo -E ~/emulator/execution/SG-CommTestBed.py.
Results analysis
Results are grouped by node name and there are two types of results:
- Traffic generators,
- Net Flow data.
Results are collected by calling a script copy_results.sh on ORBIT gateway box. It will collect all the results and copy it locally.
Once the results are collected they can be analyzed. Traffic generators can be opened using any text editor while Net Flow can be opened using excel.
Attachments (2)
-
tutorial_topo.png
(28.1 KB
) - added by 7 years ago.
Sample topology
-
sg-sdn.zip
(32.8 KB
) - added by 7 years ago.
sg-sdn-source
Download all attachments as: .zip

