| Version 34 (modified by , 3 years ago) ( diff ) |
|---|
Table of Contents
Tutorial: OpenStack Setup
Requirements:
- Setup/Practice of Orbit Nodes.
- Any available Orbit Sandbox Node
- Ubuntu 20.04.5 LTS or Ubuntu 22.04.2 LTS (Choice is up to you)
In this tutorial, we will be using one of the sb1 nodes for setting up OpenStack. However, sb(1-10) should also be capable for OpenStack setup.
Make sure you have Ubuntu 20.04.5 (baseline20.04.ndz) or 22.04.2 (ubuntu2204-beta.ndz) LTS. To get the Ubuntu Version, follow these steps after ssh'ing into your console. Substitute for the image and node you want.
The below steps illustrate loading Ubuntu 20.04.5 LTS for node1-2 of sb1. For the sb1 console,
username@console:~$ omf tell -t node1-2 -a offh
username@console:~$ omf load -t node1-2 -i baseline20.04.ndz
username@console:~$ omf tell -t node1-2 -a on
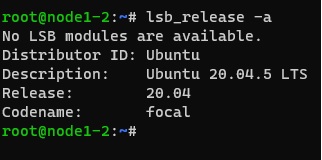
To verify if you have loaded your Ubuntu version properly, use this command after ssh into the node1-2
root@node1-2:~# lsb_release -a
This will list the current version of Ubuntu loaded.
Example Image:
Set up an OpenStack development environment via DevStack
After loading your version of Ubuntu, you can follow below steps to install OpenStack
- Update and Upgrade Packages:
root@node1-2:~# sudo apt-get update && sudo apt-get upgrade -y - Install Git:
root@node1-2:~# sudo apt-get install git
- Clone the DevStack Repository:
root@node1-2:~# git clone https://github.com/openstack/devstack.git
- Create a Stack User:
root@node1-2:~# sudo ./devstack/tools/create-stack-user.sh
- Switch to the Stack User:
root@node1-2:~# sudo su stack
stack@node1-2:/root$ cd ~ - Clone the DevStack Repository (as the Stack User):
stack@node1-2:~$ git clone https://git.openstack.org/openstack-dev/devstack
- Remove the Existing Python 3 Pip Package (if present) and Download and Install the Latest Python 3 Pip Package:
stack@node1-2:~$ sudo apt remove python3-pip
stack@node1-2:~$ wget https://bootstrap.pypa.io/get-pip.py
stack@node1-2:~$ sudo python3 get-pip.py
- Install a Specific Version of the Cryptography Package(there is version conflict with the OpenSSL package automatically installed by dev stack, install the below version to prevent this issue):
stack@node1-2:~$ pip install cryptography==38.0.4
- Copy the local.conf into the Devstack Folder:
stack@node1-2:~$ cd devstack/samples/local.conf devstackstack@node1-2:~$ cd devstack - Identify Node's IP Address; Configure and Setup local.conf in Devstack Folder According to Requirement (either the controller or compute node):
stack@node1-2:~/devstack$ hostname -I
Example Image of Getting Node's IP Address:
stack@node1-2:~/devstack$ cd
stack@node1-2:~/devstack$ nano local.conf
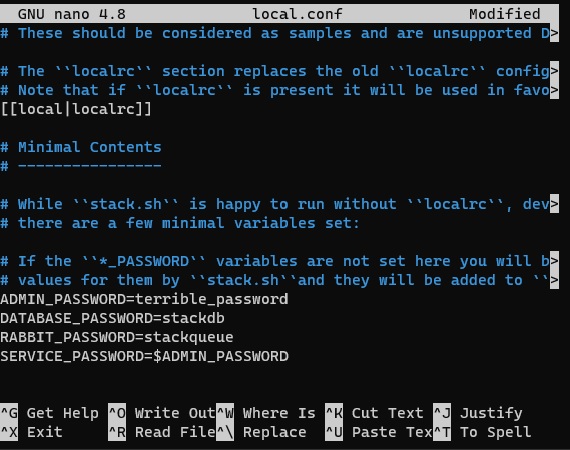
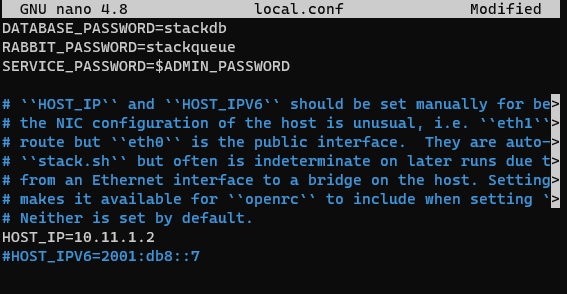
Scroll to the ADMIN_PASSWORD, and change the password to what you prefer. Afterwards, scroll to HOST_IP. Remove the comment in front of the HOST_IP and set the IP to that of the what IP address was given by hostname -I (10.11.1.2 this case). Save changes.
Example Images of Changed Password and IP Address:
Set up a remote desktop through Google Remote Desktop
To ensure OpenStack Dashboard displays, you must download Google Remote Desktop and use Google Remote Desktop
- Install XServer Packages for Google Remote Desktop:
stack@node1-2:~/devstack$ sudo apt-get install xfce4 xfce4-goodies -y
- Download Debian File for Google Remote Desktop:
stack@node1-2:~/devstack$ wget https://dl.google.com/linux/direct/chrome-remote-desktop_current_amd64.deb
- Install Google Remote Desktop:
stack@node1-2:~/devstack$ sudo apt install ./chrome-remote-desktop_current_amd64.deb -y
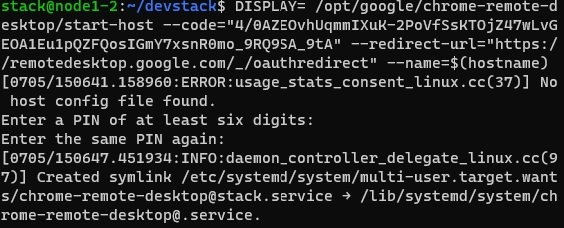
- Start the Google Remote Desktop by Logging into https://remotedesktop.google.com/headless. Click on Begin → Next → Authorize. Copy DISPLAY code into terminal:
Example of Display Code in Terminal:
- Go to https://remotedesktop.google.com/access. Click on the Node and Enter Pin. Afterwards, Select Xfce Session, which will Display the Remote Desktop Access. Afterwards, Enter the Terminal in the Xfce Session.
- Remove the psutil direction and any relevant files
stack@node1-2:~$ sudo rm -rf /usr/lib/python3/dist-packages/psutil
stack@node1-2:~$ sudo rm /usr/lib/python3/dist-packages/psutil-5.5.1.egg-info #For Ubuntu 20.04.5 LTSstack@node1-2:~$ sudo rm -rf /usr/lib/python3/psutil-5.9.0.egg-info #For Ubuntu 22.04.2 LTS - Afterwards, Install Firefox on the Xfce Session to Allow OpenStack Dashboard to Later Appear.
stack@node1-2:~$ sudo apt-get install firefox -y #For Ubuntu 20.04.5 LTS
For Ubuntu 22.04.2 LTS,
stack@node1-2:~$ wget -O ~/Firefox.tar.bz2 "https://download.mozilla.org/?product=firefox-latest&os=linux64"
stack@node1-2:~$ sudo tar xjf ~/Firefox.tar.bz2 -C /opt/
stack@node1-2:~$ cd devstack
Start the OpenStack run-program
- Run OpenStack Bash File:
stack@node1-2:~/devstack$ FORCE=yes ./stack.sh
Wait for around 15-20 minutes for all the packages and systems to be installed. Once installation is done, you are permitted to access the Horizon Dashboard and Keystone Identity. You will be prompted with a similar message to the output given below. You can CTRL+Click in the Xfce Session to navigate to the Dashboard and Identity, allowing you then to explore OpenStack and all its availabilities through DevStack.
Example Output from Successful Run:
This is your host IP address: 10.11.1.2
This is your host IPv6 address: ::1
Horizon is now available at http://10.11.1.2/dashboard
Keystone is serving at http://10.11.1.2/identity/
The default users are: admin and demo The password: *(Password set by you during installation process)
You can log in to view the Horizon dashboard(http://10.11.1.2/dashboard) using below default credentials
Hope You Figure Out the Purpose of OpenStack
Attachments (6)
- lsb_release.jpg (19.6 KB ) - added by 3 years ago.
- hostname-I.jpg (10.5 KB ) - added by 3 years ago.
- ipaddress.jpg (67.9 KB ) - added by 3 years ago.
- badpassword.jpg (91.4 KB ) - added by 3 years ago.
- goodies.jpg (72.2 KB ) - added by 3 years ago.
- runcommand.jpg (72.1 KB ) - added by 3 years ago.
Download all attachments as: .zip


