
LV-67G Specifics
Table of Contents
Flashing the LV67-G bios
Make A USB Flash disk.
Building a flash drive to update bios on LV motherboards
Table of Contents
How to build the USB boot stick:
You will need:
- Bios Image (Board Specfic)
- Rufus Utility, downloadable here
NOTE: The tools and bios files for the LV-67X line are located on the archive(Windows share: \\archive2\pub\Archive\PC\Bios)
To Create the USB Flash Disk:
- Run the Rufus utility
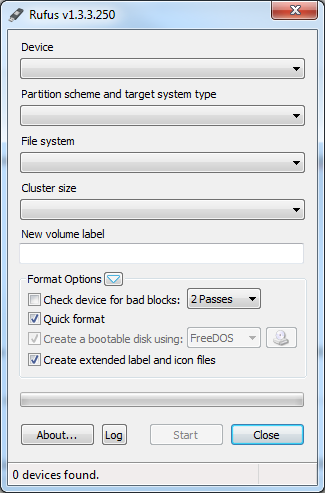
- Choose options to make the usbflash disk freedos bootable
- Once complete remount the flash disk and copy the folders containing the update utilities for the motherboards you need to update

This disk should now be capable of Flashing your bios.
In the LV-67B bios (and I suspect others in the LV line), the flash disk can be put into 1 of 3 modes USB-FDD, USB-HDD, AUTO. The Auto mode guesses either FDD or HDD. When in the FDD mode the bios treats the flash disk like a floppy. This mode DOES NOT work with the tools for building a USB flash Drive. The HDD mode does work. To use this mode however, you need to specify Hard disk as the booting device and the modify the Hard drive boot order to put your USB Flash disk first.
The LV67-G does not require an external video card. The on motherboard VGA header works and can be used to flash the bios. This version of the bios will also boot from a USB flash disk if it is attached by default.
- Attach VGA cables, keyboard, etc..
- Insert usb flash disk containing BIOS image.
- See this page for instructions on how to make a flash disk
- add the included bin file and the FPT flashing tool to this flash disk (the full file set in on the archive)
- Power on the node and let it boot into FreeDos. It may ask you to set the date and time, these can be safely ignored.
- At the C:\> prompt run:
C:/>FPT -F 67G13.BIN
Note the flashing process may take a while. - Once Flashing is done, reboot the node and enter the bios by hitting the delete key. You should press repeatedly immediately after the power reset because the window in which this bios accepts the del-menu command is very short. If you hit the key within the window the post beep will sound different (2 beeps instead of one).
- Once in the menu you can enable the console redirection and set the boot order to try the pxe interfaces first. The options are a little different…
TODO
- catalogue the exacty meu path
- use nvram tool
======= Quote from Comell's flash utility =======
1) Please refer the attached BIOS to add PXE ROM function. ME7.zip is Flash tool.

Flash Method:
1. Please make a boot-able disk.
2. Copy the BIOS file(*.BIN) you want to disk.
3. Copy the ALL File to disk.
4. Power on the system and flash the BIOS. ( Example : C:/FPT -F 67G13.BIN )
     NOTE:Underline/Underscore means SPACE 5. Shut-down system.
6. Clear CMOS.