
GENI Configuration assembly
Table of Contents
Requires:
— LV-67J — Assemble as with G except: (put link to node specific page)
- 1 160GB HDD on tray, with standoffs (add picture)
- Power button in back panel
- No CM
- Intel 1000T NIC adapter
— LV-67K — Assemble as with G except: (put link to node specific page)
- DO NOT CONNECT 4 PIN ATX12V POWER CABLE
- Mobile node uses connector for 12V dc input, with 24 pin connector acting as output. Connecting both will damage board.
- Connect new CM, attach to back panel with angle bracket, #440 screws. Choose beveled or pan head appropriately.
- Use 60gb SSD on tray, with standoffs. (add picture)
Installing the base OS
Console Machine Disk Partitioning
While setting up Ubuntu server, partition the disk as follows:
- 20 GB Primary boot partition
- 20 GB Home directory
- 116 GB create a new mount point /Export for images
- 4 GB Swap . Set the 'location' as end, and set 'use as' to swap area.
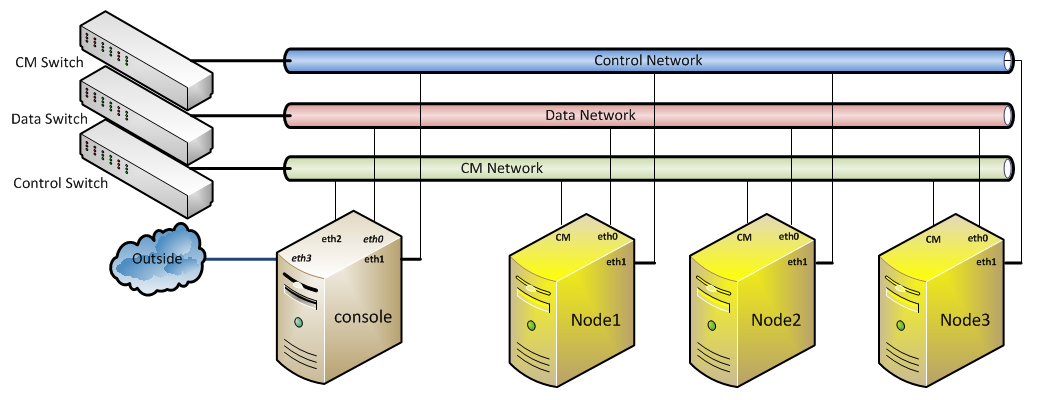
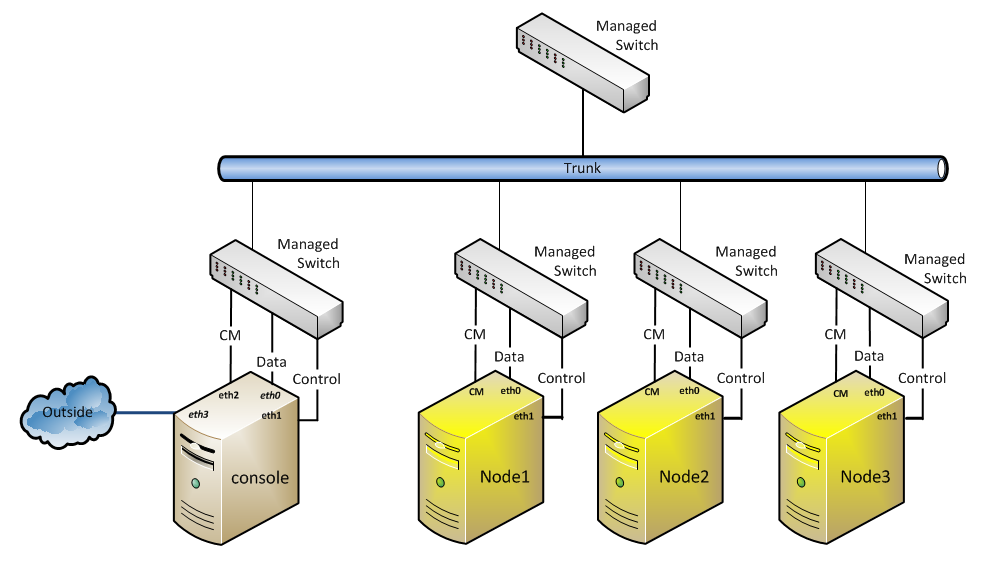
Network setup and configuration
- Three networks
- Data
- CM
- Control
- 3 switches, 1 partitioned switch, or single cable out.
Setup networking as follows on the console host
# This file describes the network interfaces available on your system
# and how to activate them. For more information, see interfaces(5).

# The loopback network interface
auto lo
iface lo inet loopback

# The CM network interface
auto eth1
iface eth1 inet static
      address 10.1.0.254
      netmask 255.255.255.0
      broadcast 10.1.0.255

# The Control network interface
auto eth3
iface eth3 inet static
      address 10.10.0.254
      netmask 255.255.255.0
      broadcast 10.10.0.255

# The  Data network interface
auto eth0
iface eth0 inet static
      address 10.20.0.254
      netmask 255.255.255.0
      broadcast 10.20.0.255

# The primary network interface
auto eth2
iface eth2 inet dhcp
One unmanaged switch per subnet

Single managed switch

Single trunk per node

Software Configuration
Add HOSTNAME and CNAME information to /etc/hosts/
root@console:~# cat /etc/hosts
127.0.0.1       localhost console xmpp console.geni.net xmpp.geni.net
Add the following line to the /etc/apt/sources.list
deb http://pkg.mytestbed.net/ubuntu precise/
Follow the steps on http://mytestbed.net/projects/omf54/wiki/Installation_Guide_54 to install OMF 5.4.
Please setup DNS to resolve locally rather than use the domain setup by the dhcp client. This will help create your own sub-domain for OMF services such as XMPP,inventory and wimax-rf.
Remove any "search" entries from /etc/resolv.conf as well as remove the "request domain-*" parameters from /etc/dhcp/dhclient.conf NOTE THIS IS OLD, NEW INSTRUCTIONS BELOW
Configure Apt Repository
wget -qO - http://packages.orbit-lab.org/downloads/orbitapt.gpg.key | sudo apt-key add -
sudo wget -qO /etc/apt/sources.list.d/orbit.list http://packages.orbit-lab.org/downloads/orbit-precise.list
Setting up DNSMASQ
Edit /etc/dnsmasq.conf and at the end of the file add
interface=eth0,eth1,eth3
dhcp-range=10.1.0.0,static,12h
dhcp-range=10.10.0.0,static,12h
dhcp-range=10.20.0.0,static,12h
dhcp-option=3
dhcp-option=option:ntp-server,10.10.0.254
dhcp-boot=net:control,pxelinux.0
enable-tftp
tftp-root=/tftpboot
Edit /etc/dnsmasq.d/omf_testbed.conf and add separate entries for the CM,control and data interfaces
# CM
dhcp-host=00:20:4a:d5:94:28,10.1.0.1,cons1-1
dhcp-host=00:20:4a:d5:94:2a,10.1.0.2,cons1-2
dhcp-host=00:20:4a:d5:94:27,10.1.0.3,cons1-3

# CTRL
dhcp-host=00:03:1d:0c:d3:7e,10.10.0.1,node1-1
address=/node1-1/node1-1.geni.net/10.10.0.1
ptr-record=node1-1.geni.net,10.10.0.1
dhcp-option=00031d0cd37e,12,"node1-1.geni.net"
dhcp-host=00:03:1d:0c:d3:61,10.10.0.2,node1-2
address=/node1-2/node1-2.geni.net/10.10.0.2
ptr-record=node1-2.geni.net,10.10.0.2
dhcp-option=00031d0CD361,12,"node1-2.geni.net"
dhcp-host=00:03:1d:0c:d3:63,10.10.0.3,node1-3
address=/node1-3/node1-3.geni.net/10.10.0.3
ptr-record=node1-3.geni.net,10.10.0.3
dhcp-option=00031d0cD363,12,"node1-3.geni.net"

# DATA
dhcp-host=00:03:1D:0c:d3:7e,10.20.0.1,dnode1-1
dhcp-host=00:03:1D:0c:d3:60,10.20.0.2,dnode1-2
dhcp-host=00:03:1D:0c:d3:62,10.20.0.3,dnode1-3
In /etc/default/dnsmasq uncomment the following line
IGNORE_RESOLVCONF=yes
{{{ IVAN!!!!!
configure bind configure isc-dhcp root@console:/etc/resolvconf/resolv.conf.d# emacs tail
}}}
Setting up XMPP service
- In the /etc/java-6-openjdk/security/java.security file, comment out the following line:
security.provider.9=sun.security.pkcs11.SunPKCS11 ${java.home}/lib/security/nss.cfg - Open /etc/init.d/openfire file in an editor and modify line 27 to point to the correct java directory. In our case, it is /usr/lib/jvm/java-6-openjdk.
- Start openfire using command
/etc/init.d/openfire start
- Check if openfire is running: ps aux | grep openfire . Startup can take a while, please be patient.
- Direct your web browser to http://localhost:9090 and begin the setup wizard. If you are unable to connect to http://localhost:9090, then do the following:
- Choose your language and click continue
- Enter the AM's hostname in the Domain field and click continue
- Choose the embedded database and continue.
- Choose the default profile and click continue
- Enter an admin password and click continue, then wait until the installation is finished. In most cases, the username and password is 'admin'.
Setting up CMC service
In /etc/omf-aggrmgr-5.4/available/cmc.yaml file , replace original contents with the following and replace inventory URL with the correct hostname
---
cmc:
  # inventory_url: URL to the Inventory OMF
  inventory_url: 'http://console:5054/inventory'
  default_off: "hard"
Setting up Inventory service
Copy over the latest inventory service from internal1. Install missing dependencies
    data_mapper
    dm-sqlite-adapter
    net-scp
    net-ssh
    oml4r
    open4
    rparsec
    rufus-scheduler
    snmp
    dm-do-adapter
    dm-mysql-adapter
    actionmailer -v '3.2.11' (higher version need ruby 1.9.3)

        using command:

        GEM_HOME=/usr/share/omf-aggmgr-5.4/gems/1.8/ gem install --no-rdoc --no-ri <name_of_the_gems>

    Before installing dm-sqlite-adapter, make sure you have libsqlite3-dev installed using command:

    sudo apt-get install libsqlite3-dev
    sudo apt-get install libldap2-dev,libsasl2-dev
After installing the ogs_inventory package to /usr/share/omf-aggmgr-5.4/omf-aggmgr/
- Get the updated PXE service.
- Create a symlink in /tftpboot/pxelinux.cfg
ln -s pxeconfig omf-5.4
- Edit the file /usr/share/omf-expctl-5.4/repository/system/exp/stdlib.rb; change default delay from 230 to 90
- Install response.rb to /usr/share/omf-common-5.4/omf-common/
- Create user omf in mysql and give it "grant all privileges"
- Create database "inventory" in mysql
- Populate inventory database with initial data
Populate inventory database with initial data
- Add testbed to inventory database
Modify the addTestbed.rb file to point to the correct inventory database
@host = "http://localhost:5054/inventory/"
Modify property file testbed_attributes.yaml according to your testbed attributes.
Add testbed to inventory database using:
ruby addTestbed.rb
This will create machines.sql file. Execute that SQL file with:
mysql inventory < machines.sql
- Add nodes to inventory database
Modify the addNode.rb file to point to the correct inventory database
@host = "http://localhost:5054/inventory/"
Create node_attributes.yaml file with node attributes (like node1_attributes.yaml, node2_attributes.yaml and node3_attributes.yaml).
Add all the nodes to the inventory database using:
ruby addNode.rb <node_fqdn> <node_attributes.yaml>
Installing Wimaxrf Software
This installation is meant to work with OMF 5.4 on Ubuntu 12.04
- Run the following commands as root.
  cd /usr/share/omf-aggmgr-5.4/omf-aggmgr
  git clone https://github.com/gpauusa/wimaxrf.git ogs_wimaxrf
  cd /etc/omf-aggmgr-5.4/enabled
  ln -s ../available/wimaxrf.yaml
- Copy the attached config file to /etc/omf-aggmgr-5.4/available/wimaxrf.yaml. Make modifications to the file according to your testbed.
- Use the following command to see where click is installed. The command should return the location of installation for Click. Use this to determine the Click version as shown in the next step.
which click
- Use the directory from above to check the version of Click installed. Please use the following command to do the same. This version of wimaxrf is known to work with Click 2.1 and Click 2.01. If you are running an older version of Click, please update to Click 2.1 from https://github.com/kohler/click.
sudo /usr/bin/click --version
Setting up Login Service
- From exernal1, get ogs_scheduler from /usr/share/omf-aggmgr-5.4/omf-aggmgr, /usr/share/omf-aggmgr-5.4/omf-aggmgr/public_html/tempalte and scheduler.yaml from /etc/omf-aggmgr-5.4/enabled and save it to /usr/share/omf-aggmgr-5.4/omf-aggmgr , /usr/share/omf-aggmgr-5.4/omf-aggmgr/public_html/tempalte and /etc/omf-aggmgr-5.4/available,respectively, on your console.
- Similarly, copy ogs_loginCommon from external1 from /usr/share/omf-aggmgr-5.4/omf-aggmgr into the corresponding folder of console.
- Enable the scheduler service. This can be done by going into the cd /etc/omf-aggmgr-5.4/enabled/ directory and running the following command.
ln -s ../available/scheduler.yaml
- Please run the following commands to get the missing dependencies.
sudo apt-get install graphicsmagick-libmagick-dev-compat
sudo apt-get install libmagickwand-dev
sudo GEM_HOME=/usr/share/omf-aggmgr-5.4/gems/1.8/ gem install --no-rdoc --no-ri rmagick
sudo apt-get install libldap2-dev
sudo apt-get install libsasl2-dev
sudo GEM_HOME=/usr/share/omf-aggmgr-5.4/gems/1.8/ gem install --no-rdoc --no-ri ruby-ldap
The scheduler.yaml file is shown below:
 scheduler:
    # need in /etc/apache2/sites-available/default: ProxyPass /userManagement "http://<host>:5054/scheduler/userManagement"
    umURL: 'http://www.geni.net/userManagement'
    # need in /etc/apache2/sites-available/default-ssl: ProxyPass /loginService http://<host>:5054/scheduler/
    sslURL: 'https://www.geni.net/loginService'
    # need in /etc/apache2/sites-available/default-ssl: ProxyPass /schedule http://<host>:5054/scheduler/ShowScheduler
    # not mandatory - schedulerURL can be determined by sslURL+'/ShowScheduler'
    #schedulerURL: 'https://www.geni.net/schedule'
    schedulerURL: 'https://www.geni.net/loginService/ControlPanel'
    sleep: 180
    approveTime: 600
    database:
        # User name and password for scheduler database
        user: 'geni'
        password: 'genipwd'
        host: 'internal1.geni.net'
        database: 'newScheduler'
        approveSeparatly: true # calculate time spend od domain separetely (only for domains listed in listOfDomains)
        listOfDomains: #grid,outdoor, list of domains to calculate user time separetely, all other domains accumulate
          - grid
    auth:
        class: LdapAuth
        homeDir: '/home/'
        nullHost: null.geni.net
        autohomehost: home.geni.net
        autohome-opts: '-fstype=nfs,hard,intr,rsize=8192,wsize=8192,nodev,nosuid'
        servers:
            -
                # primary LDAP server
                secret: 'srishti523'
                host: 'ldap2.geni.net'
                base: 'dc=geni, dc=net'
                version : 3
            -
                # alternate LDAP server
                secret: 'srishti523'
                host: 'ldap1.geni.net'
                base: 'dc=geni, dc=net'
    email:
        # email server configuration
        host: 'geni.net'
        port: 25
    admins:
        - 'native'

    scheduler:
        prefix: 'sc4'
        email:
            # sender and administrastor email configuration
            sender: 'schedule@geni.net'
            sender_name: 'GENI Schedule'
            emailAdmin: 1
        layout:
            # colors
            myres: '#5E7FB1'
            mypastres: '#A0A1A1'
            otherres: '#D2DDEC'
            otherpastres: '#CFCFCF'
            pending: '#E4DC04'
            blackout: '#6F292D'
            conflict: '#FF0000'
    registration:
        email:
            # sender and administrastor email configuration
            sender: 'account-manager@geni.net'
            sender_name: 'Account manager'
            emailAdmin: 1
        captcha:
            temp_image_dir: '/tmp'
            ttf_file: 'images/font21.ttf'
Follow the steps given below to setup the scheduler.
- Configuring apache web server
- In the following we are assuming that <host> is the internal hostname or IP address of the machine running the login AM, and <port> is the IP port on which the service is running (default is 5054 for OMF 5.4services). For example, for internal IP 172.16.250.7 and port 5024 the <host>:<port> would be: 172.16.250.7:5054.
ServerName <server_name>
ProxyPass /userManagement "http://<host>:<port>/login/userManagement"
<Location /userManagement>
  Order allow,deny
  Allow from all
</Location>
Note: If you change baseURL and publicURL in scheduler.yaml it is necessary to change corresponding values in apache default file.
- For SSL services (in /etc/apache2/sites-available/default-ssl) we need:
- If we want to have it as a separate link for /scheduler, than add this
    ProxyPass /schedule/  "http://<host>:<port>/login/ShowScheduler"
    <Location /schedule >
    Order allow,deny
    Allow from all
    </Location>
ProxyPass /loginService/ http://<host>:<port>/login/ <Location /loginService> AllowOverride None order allow,deny allow from all </Location> <Proxy http://<host>:<port>/login/*> AllowOverride None order allow,deny allow from all </Proxy>
- If we want to have it as a separate link for /scheduler, than add this
- From internal2, get ogs_login from /usr/share/omf-aggmgr-5.4/omf-aggmgr and login.yaml from /etc/omf-aggmgr-5.4/enabled and save it to /usr/share/omf-aggmgr-5.4/omf-aggmgr and /etc/omf-aggmgr-5.4/available,respectively, on your console. The login.yaml is shown below.
  login:
    approveTime: 600
    database:
        # User name and password for scheduler database
        user: 'geni'
        password: 'genipwd'
        host: 'internal1.geni.net'
        database: 'newScheduler'
        approveSeparatly: true # calculate time spend od domain separetely (only for domains listed in listOfDomains)
        listOfDomains: #grid,outdoor, list of domains to calculate user time separetely, all other domains accumulate
          - grid
    auth:
        class: LdapAuth
        homeDir: '/home/'
        nullHost: null.geni.net
        autohomehost: home.geni.net
        autohome-opts: '-fstype=nfs,hard,intr,rsize=8192,wsize=8192,nodev,nosuid'
        servers:
            -
                # primary LDAP server
                secret: 'srishti523'
                host: 'ldap2.geni.net'
                base: 'dc=geni, dc=net'
            -
                # alternate LDAP server
                secret: 'srishti523'
                host: 'ldap1.orbit-lab.org'
                base: 'dc=geni, dc=net'
    email:
        # email server configuration
        host: 'geni.net'
        port: 25
    admins:
        - 'native'

    scheduler:
        prefix: 'sc4'
        email:
            # sender and administrastor email configuration
            sender: 'schedule@geni.net'
            sender_name: 'ORBIT Schedule'
            emailAdmin: 1
- Modify login.yaml and scheduler.yaml according to your testbed.
Setting up Status Service
- From external1, get ogs_status from /usr/share/omf-aggmgr-5.4/omf-aggmgr and login.yaml from /etc/omf-aggmgr-5.4/enabled and save it to /usr/share/omf-aggmgr-5.4/omf-aggmgr and /etc/omf-aggmgr-5.4/available,respectively, on your console. The staus.yaml is shown below.
- From external1 get statusPage from /usr/share/omf-aggmgr-5.4/omf-aggmgr/public-html and save it to /usr/share/omf-aggmgr-5.4/omf-aggmgr/public-html on your console
status:
  inventory_url: 'http://localhost:5054/inventory'
  cmc_url: 'http://localhost:5054/cmc'
Configure apache web server for this service (in /etc/apache2/sites-available/default)
   ProxyPass /statusService/ "http://console.geni.net:5054/status/"
   ProxyPass /status/orbit "http://console.geni.net:5054/status/statusPage
   ProxyPass /status/resource "http://console.geni.net:5054/scheduler/resourceStatus"
Setting up LDAP client
NOTE: EVERYTHING THAT IS ORBIT-LAB.ORG SHOULD BE GENI.NET
- Install ldap libraries using command
apt-get install libpam-ldap libnss-ldap
This process will ask you a bunch of ldap related questions that will be used to prime the ldap.confs (there are 2). It's not critical to get them correct as we're just going to replace those conf's any way. (Accepting the defaults is ok).
- Edit the /etc/ldap.conf file to configure the ldap client.
    base dc=geni,dc=net
    uri ldap://ldap.geni.net/
    ldap_version 3
    binddn
    rootbinddn cn=admin,dc=geni,dc=net
    pam_password md5
    nss_initgroups_ignoreusers backup,bin,daemon,games,gnats,irc,libuuid,libvirt- qemu,list,lp,mail,man,messagebus,news,ntp,postfix,proxy,root,sshd,statd,sync,sys,syslog,usbmux,uucp,www-data
You could edit this file and change all the values to reflect this (leaveing the rest as comments) or simply replace the one you have with this one. You can also check the non-comment lines by executing:
egrep -v "^#|^$" /etc/ldap.conf
- The /etc/ldap/ldap.conf is the second file that guides the client.
    BASE    dc=geni,dc=net
    URI     ldap://ldap.geni.net
Again you can edit it directly or copy this version.
- The /etc/nsswitch.conf file should have the follow non comment lines:
    passwd:         files ldap compat
    group:          files ldap compat
    shadow:         files compat

    hosts:          files dns
    networks:       files

    protocols:      db files
    services:       db files
    ethers:         db files
    rpc:            db files

    netgroup:       nis
- Copy or create the /etc/ldap.secret file. It should contain the ldap password in clear text.
- Finally add the follow line to the /etc/sudoers file (note this is done with the visudo command).
    %admin ALL=(ALL) ALL
    %sysadmin ALL=NOPASSWD: ALL
This has to be done manually.
- Install other software:
apt-get install cfengine3 emacs ntp
- We need to make sure machine have fully qualified host name (some services depend on it). So:
echo "console.geni.net" > /etc/hostname
- Install Apache web server
apt-get install apache2
- Install apache's proxy package and enable it.
 apt-get install libapache2-mod-proxy-html
 a2enmod proxy
 a2enmod proxy_http
Setting up LDAP server
- Decide on the organizational structure for ldap:
geni.net => dc=geni,dc=net
apt-get install slapd ldap-utils phpldapadmin
(if any error is made during the initial installation, LDAP can be reconfigured with: dpkg-reconfigure slapd)
- Omit OpenLDAP server configuration? No
- DNS domain name: geni.net #The DNS domain name is used to construct the base DN of the LDAP directory.
- Organization name: GENI
- Password: Sg10l3P
- Database backend to use: HDB
- Do you want the database to be removed when slapd is purged? : Yes
- Move old database? Yes
- Allow LDAPv2 protocol? No
- Edit /etc/ldap.conf
- Check that you have a proper URI (round line 30):
uri ldap://console.geni.net/
- Uncommend line for host attribute:
pam_check_host_attr yes
- Check that you have a proper URI (round line 30):
- Add these two schemas to your ldap by copying to schema directory (/etc/ldap/slapd.d/cn=config/cn=schema)
cd  /etc/ldap/slapd.d/cn\=config/cn\=schema
wget http://wimax.orbit-lab.org/mmm/cn={4}openssh-lpk-opnldap.ldif
wget http://www.orbit-lab.org/mmm/cn={5}ldapns.ldif
- Import initial group and user
cd /etc/ldap wget http://www.orbit-lab.org/mmm/cn={5}ldapns.ldif ldapadd -vvv -x -D cn=admin,dc=geni,dc=net -H ldap:/// -W -f init.ldif - Fix the configuration for LDAP for phpldapadmin:
edit /etc/phpldapadmin/config.php and change dc=example,dc=com to dc=geni,dc=net $servers->setValue('server','base',array('dc=geni,dc=net')); $servers->setValue('login','bind_id','cn=admin,dc=geni,dc=net'); - Point the Firefox web browser to http://<ip>/phpldapadmin. Set password for group admin user (add attribute → Password → set password → update object)
- Make sure you can access the service with admin credentials:
   ldapsearch -x   -b "dc=geni,dc=net"  "objectClass=organizationalRole"
   ldapsearch -x   -b "dc=geni,dc=net"  "objectClass=organizationalUnit"
   ldapsearch -x   -b "dc=geni,dc=net"  "objectclass=organizationalUnit"
   ldapsearch -x   -b "dc=geni,dc=net"  "objectClass=posixGroup"
   ldapsearch -x localhost -D "cn=admin,dc=geni,dc=net" -W -b "dc=geni,dc=net" uid=*
Attachments (3)
- 4Node_1.png (80.3 KB ) - added by 13 years ago.
- 4Node_2.png (67.6 KB ) - added by 13 years ago.
- 4Node_3.png (90.8 KB ) - added by 13 years ago.
Download all attachments as: .zip