| Version 39 (modified by , 13 years ago) ( diff ) |
|---|
GENI Configuration assembly
Table of Contents
Requires:
— LV-67J — Assemble as with G except: (put link to node specific page)
- 1 160GB HDD on tray, with standoffs (add picture)
- Power button in back panel
- No CM
- Intel 1000T NIC adapter
— LV-67K — Assemble as with G except: (put link to node specific page)
- DO NOT CONNECT 4 PIN ATX12V POWER CABLE
- Mobile node uses connector for 12V dc input, with 24 pin connector acting as output. Connecting both will damage board.
- Connect new CM, attach to back panel with angle bracket, #440 screws. Choose beveled or pan head appropriately.
- Use 60gb SSD on tray, with standoffs. (add picture)
Installing the base OS
Console Machine Disk Partitioning
While setting up Ubuntu server, partition the disk as follows:
- 20 GB Primary boot partition
- 20 GB Home directory
- 116 GB create a new mount point /Export for images
- 4 GB Swap . Set the 'location' as end, and set 'use as' to swap area.
Network setup and configuration
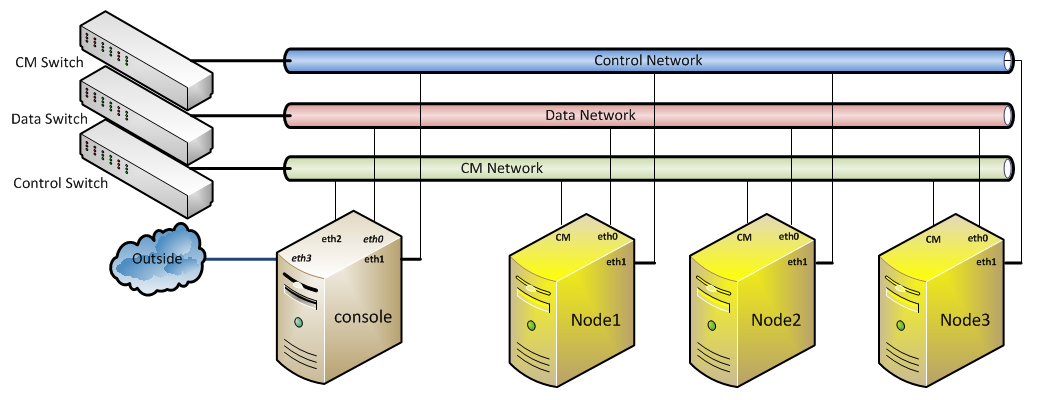
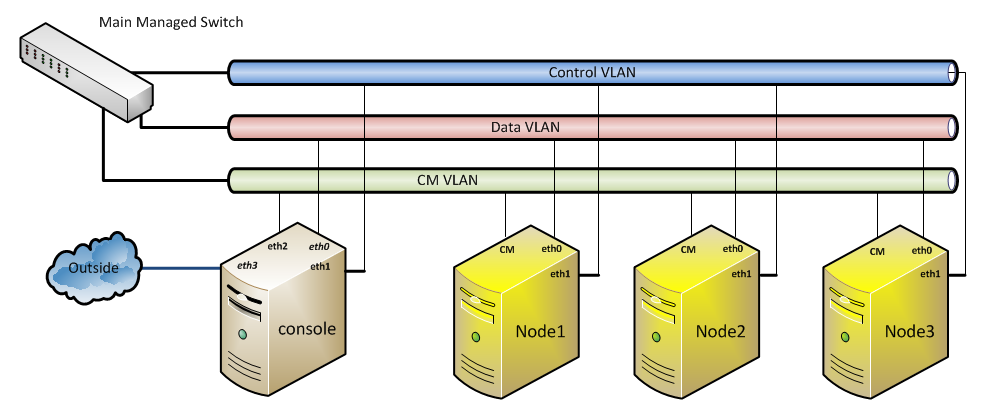
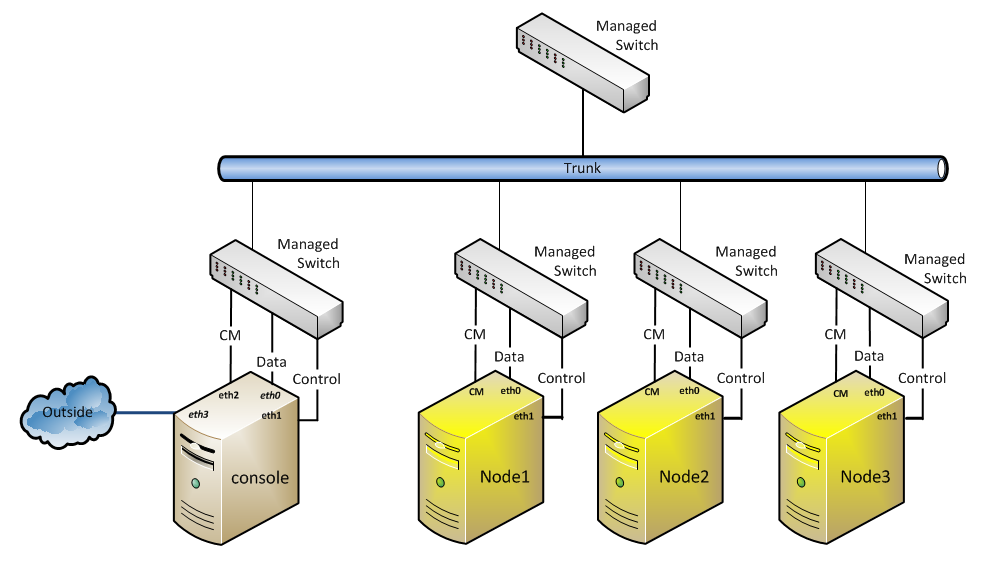
- Three networks
- Data
- CM
- Control
- 3 switches, 1 partitioned switch, or single cable out.
One unmanaged switch per subnet
Single managed switch
Single trunk per node
Software Configuration
Add the following line to the /etc/apt/sources.list
deb http://pkg.mytestbed.net/ubuntu precise/
Follow the steps on http://mytestbed.net/projects/omf54/wiki/Installation_Guide_54 to install OMF 5.4.
Please setup DNS to resolve locally rather than use the domain setup by the dhcp client. This will help create your own sub-domain for OMF services such as XMPP,inventory and wimax-rf.
Remove any "search" entries from /etc/resolv.conf as well as remove the "request domain-*" parameters from /etc/dhcp/dhclient.conf
Setting up DNSMASQ
Edit /etc/dnsmasq.conf and at the end of the file add
interface=eth0,eth1,eth3
dhcp-range=10.1.0.0,static,12h
dhcp-range=10.10.0.0,static,12h
dhcp-range=10.20.0.0,static,12h
dhcp-option=3
dhcp-option=option:ntp-server,10.10.0.1
dhcp-boot=net:control,pxelinux.0
enable-tftp
tftp-root=/tftpboot
Edit /etc/dnsmasq.d/omf_testbed.conf and add separate entries for the CM,control and data interfaces
# CM
dhcp-host=00:20:4a:d5:94:28,10.1.0.1,cons1-1
dhcp-host=00:20:4a:d5:94:2a,10.1.0.2,cons1-2
dhcp-host=00:20:4a:d5:94:27,10.1.0.3,cons1-3

# CTRL
dhcp-host=00:03:1d:0c:d3:7e,10.10.0.1,node1-1
address=/node1-1/node1-1.geni.net/10.10.0.1
ptr-record=node1-1.geni.net,10.10.0.1
dhcp-option=00031d0cd37e,12,"node1-1.geni.net"
dhcp-host=00:03:1d:0c:d3:61,10.10.0.2,node1-2
address=/node1-2/node1-2.geni.net/10.10.0.2
ptr-record=node1-2.geni.net,10.10.0.2
dhcp-option=00031d0CD361,12,"node1-2.geni.net"
dhcp-host=00:03:1d:0c:d3:63,10.10.0.3,node1-3
address=/node1-3/node1-3.geni.net/10.10.0.3
ptr-record=node1-3.geni.net,10.10.0.3
dhcp-option=00031d0cD363,12,"node1-3.geni.net"

# DATA
dhcp-host=00:03:1D:0c:d3:7e,10.20.0.1,dnode1-1
dhcp-host=00:03:1D:0c:d3:60,10.20.0.2,dnode1-2
dhcp-host=00:03:1D:0c:d3:62,10.20.0.3,dnode1-3
In /etc/default/dnsmasq uncomment the following line
IGNORE_RESOLVCONF=yes
Setting up XMPP service
In the /etc/java-6-openjdk/security/java.security file, comment out the following line:
security.provider.9=sun.security.pkcs11.SunPKCS11 ${java.home}/lib/security/nss.cfg
Setting up CMC service
In /etc/omf-aggrmgr-5.4/available/cmc.yaml file , replace original contents with the following and replace inventory URL with the correct hostname
---
cmc:
  # inventory_url: URL to the Inventory OMF
  inventory_url: 'http://console:5054/inventory'
  default_off: "hard"
Setting up Inventory service
Copy over the latest inventory service from internal1. Install missing dependencies
    data_mapper
    dm-sqlite-adapter
    net-scp
    net-ssh
    oml4r
    open4
    rparsec
    rufus-scheduler
    snmp
    dm-do-adapter
    dm-mysql-adapter

        using command:

        GEM_HOME=/usr/share/omf-aggmgr-5.4/gems/1.8/ gem install --no-rdoc --no-ri <name_of_the_gems>

    Before installing dm-sqlite-adapter, make sure you have libsqlite3-dev installed using command:

    sudo apt-get install libsqlite3-dev
After installing the ogs_inventory package to /usr/share/omf-aggmgr-5.4/omf-aggmgr/
Install response.rb to /usr/share/omf-common-5.4/omf-common/ Create user omf in mysql and give it "grant all privileges" Create database "inventory" in mysql Define the testbed
wget -qO- 'http://console:5054/inventory/resource_add?name=geni.net&type=testbed'
Modify the addNode.rb file to point to the correct inventory database
@host = "http://console:5054/inventory/"
Add all the nodes to the inventory database using
ruby addNode.rb <node_fqdn>
Installing Wimaxrf Software
This installation is meant to work with OMF 5.4 on Ubuntu 12.04
- Run the following commands as root.
  cd /usr/share/omf-aggmgr-5.4/omf-aggmgr
  git clone https://github.com/gpauusa/wimaxrf.git ogs_wimax rf
  cd /etc/omf-aggmgr-5.4/enabled
  ln -s ../available/wimaxrf.yaml
- Copy the attached config file to /etc/omf-aggmgr-5.4/available/wimaxrf.yaml.
Setting up Login Service
- Install ldap libraries using command
apt-get install libpam-ldap libnss-ldap
Attachments (3)
- 4Node_1.png (80.3 KB ) - added by 13 years ago.
- 4Node_2.png (67.6 KB ) - added by 13 years ago.
- 4Node_3.png (90.8 KB ) - added by 13 years ago.
Download all attachments as: .zip


