Spectrum sensing with USRP2 and wiserd
Table of Contents
- SDR Tutorials
Description
This tutorial will utilize Wiserd to set up USRPs for signal transmission and reception.
Hardware / Software Resources utilized
- Grid nodes with a USRP2 connect via Ethernet.
- baseline-sdr.ndz: disk image loaded onto nodes.
- Wiserd - interface to configure and stream data to/from USRPs.
- octave - generate transmit data file and plot received data file.
Set up
- To get started first make a reservation on the Orbit Scheduler for using the Grid.
- After logging into grid console, make sure all nodes are turned off
nilanjan@console.grid:~$ omf tell -a offh -t system:topo:all
- Verify state of node before continuing. Make sure all nodes are in the POWEROFF state.
nilanjan@console.grid:~$ omf stat -t system:topo:all
- Image nodes
nilanjan@console.grid:~$ omf load -i baseline-sdr.ndz -t node20-20,node19-19,node8-8 -r 20
- After nodes are imaged, verify that nodes are in POWEROFF state. Otherwise issue the following to turn them off for a reboot
nilanjan@console.grid:~$ omf tell -a offh -t system:topo:all
- Turn nodes back on and verify they are in POWERON state
nilanjan@console.grid:~$ omf tell -a on -t node20-20,node19-19,node8-8
In this example node8-8 and node19-19 is used as the transmitting nodes and the node20-20 as the receiver
Generate signal source file using octave
On each transmiting node, create a signal file using octave. You can use the scripts provided here as an example. On node8-8 create a file s1.bin using the lines below
root@node8-8:~# cd wiserd
root@node8-8:~/wiserd# octave
octave:1> signal = fGenFDSignal(256,50,10,'1half');
octave:2> saveToWiserdFile(signal,'s1.bin');
octave:3> exit
The signal will look something like the following in the frequency domain - notice the first half of the spectrum is populated:
Create a similar signal on node19-19 but with the 2nd half of the spectrum populated
octave:1> signal = fGenFDSignal(256,50,10,'2half');
octave:2> saveToWiserdFile(signal,'s2.bin');
Set up transmitting node
- ssh into each node and start the wiserd interface:
root@node8-8> wiserd
linux; GNU C++ version 4.8.2; Boost_105400; UHD_003.008.002-86-g566dbc2b

-- Opening a USRP2/N-Series device...
-- Current recv frame size: 1472 bytes
-- Current send frame size: 1472 bytes
-- Detecting internal GPSDO.... No GPSDO found
-- Successfully tuned to 900.000000 MHz
--
-- Successfully tuned to 900.000000 MHz
--
Ready!
>
- At the wiserd prompt set the carrier frequency, sampling rate & gain. Then link the transmitter to the signal source which is the binary file generated in octave from prior step:
> --uhd_tx_freq 700e6 --uhd_tx_rate 5e6 --uhd_tx_gain 20 --tran_wavefilename s1.bin
-- Successfully tuned to 700.000000 MHz
uhd_tx_freq 700000000
uhd_tx_gain 20
uhd_tx_rate 5000000
> --addmodule signalfromfile
Consumer signalfromfile added
LLLLLLLLLLLLLLLLLLLLLLLLLLLLLLLLLLLLLLLLLLLLLLLLLLLLLLLLLLLLLLLLLLLLLLLLLLLLLLLLLLLLLLLLLLLLLLLLLLLLLLLLLLLLLLLLLLLLLLLLLLLLLLLLLLLLLLLLLLLLLLLLLLLLLLLLLLLLLLLLLLLLLLLLLLLLLLLLLLLLLLLLLLLLLLLLLLLLLLLLLLLLLLLLLLLLLLLLLLLLLLLLLLLLLLLLLLLLLLLLLLLLLLLLLLLLLLLLLLLLLLLLLLLLLLLLLLLLLLLLLLLLLLLLLLLLLLLLLLLLLLLLLLLLLLLLLLLLLLLLLLLLLLLLLLLLLLLLLLLLLLLLLLLLLLLL
>
In order to set parameter values, multiple arguments can be used in one line:
—uhd_tx_freq set carrier frequenct to 700MHz
—uhd_tx_rate set sampling rate to 5M samples/sec
—uhd_tx_gain set transmit gain to 20dB.
—tran_wavefilename tells the links the transmitter source to a binary filename.
—addmodule signalfromfile opens the above filename, reads the samples and streams to the usrp.
At this point the USRP will continuously transmit the signal util the delete command is issued:
—delmodule signalfromfile stops tranmitting signal.
Now set up the transmitter on node19-19 using similar commands.
Set up receiving node(s)
On the receiving node (node20-20), run wiserd to capture a snapshot of the signal from both transmitters.
root@node20-20> wiserd
linux; GNU C++ version 4.8.2; Boost_105400; UHD_003.008.002-86-g566dbc2b

-- Opening a USRP2/N-Series device...
-- Current recv frame size: 1472 bytes
-- Current send frame size: 1472 bytes
-- Detecting internal GPSDO.... No GPSDO found
-- Successfully tuned to 900.000000 MHz
--
-- Successfully tuned to 900.000000 MHz
--
Ready!
> --uhd_rx_freq 700e6 --uhd_rx_rate 5e6 --uhd_rx_gain 20 --recv_running_time 1000 --recv_output_filename rx_signal
-- Successfully tuned to 700.000000 MHz
--
recv_output_filename rx_signal
recv_running_time 1000
uhd_rx_freq 700000000
uhd_rx_gain 20
uhd_rx_rate 5000000
> --addmodule timesamplestofile --timed
Consumer timesamplestofile added
Consumer timesamplestofile finished

> exit
Here the set command has an additional argument to limit capturing to 1000 milliseconds:
—recv_output_filename set receiving signal filename.
—recv_running_time set receiver run time in milliseconds. (optional)
The —addmodule command options
—addmodule timesamplestofile streams data from receiver to file
—timed runs receiver for the specified amount of time. (optional)
Received signal file name will automatically be appended with the frequency, rate and gain:
root@node20-20> ls -ltr *.bin
-rw-r--r-- 1 root root 40003072 May 21 10:56 rx_signal_freq700000000_rate5000000_gain20.bin
Use octave to view the spectrum image:
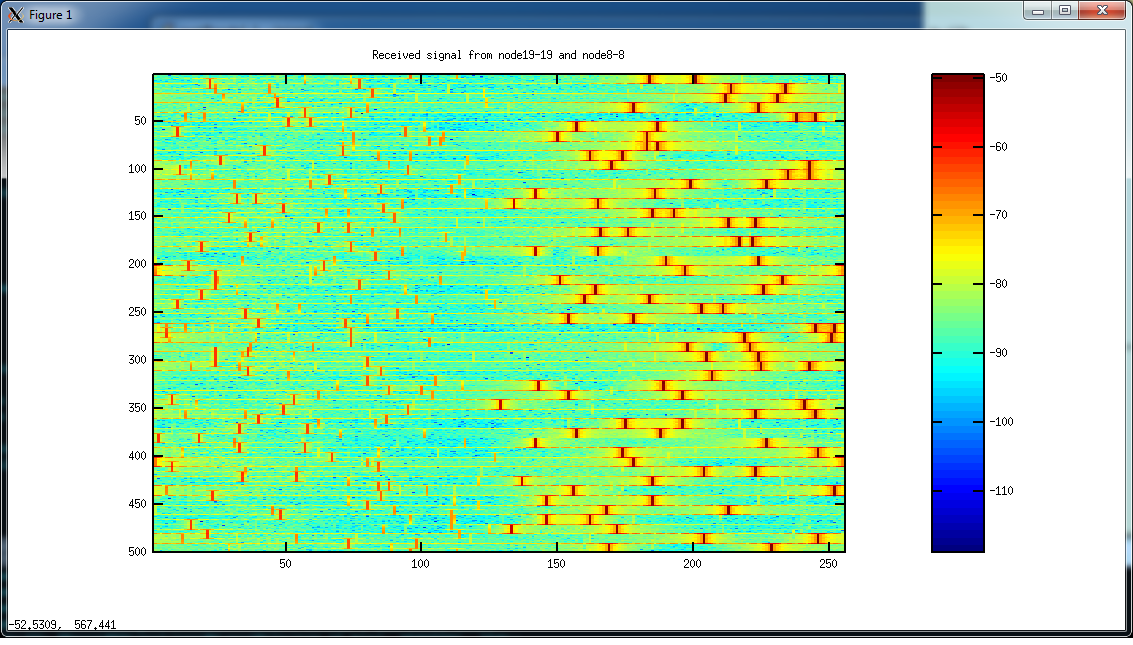
octave:1> fReconFDSignal(readWiserdFile('rx_signal_freq700000000_rate5000000_gain20.bin', 256*500), 256);
Received signal should look simiar to
Attachments (11)
- spectrum_measurement_node8-8 (24.6 MB ) - added by 13 years ago.
- noise_floor.png (715.4 KB ) - added by 13 years ago.
- f5.002.png (659.3 KB ) - added by 13 years ago.
- spectrum_console.cpp (5.4 KB ) - added by 13 years ago.
- CWriteOML_spectrum.h (5.2 KB ) - added by 13 years ago.
- spectrum.cpp (9.9 KB ) - added by 13 years ago.
- s1.png (44.8 KB ) - added by 11 years ago.
- s2.png (44.9 KB ) - added by 11 years ago.
- signal.png (204.0 KB ) - added by 11 years ago.
- fReconFDSignal.m (240 bytes ) - added by 11 years ago.
- readWiserdFile.m (675 bytes ) - added by 11 years ago.


