Zynq-based WISER platform - Start-up test
Table of Contents
- SDR Tutorials
Description
This tutorial shows how to load the Zynq-based WISER platform (Zedboard + ADFMCOMMS1) on ORBIT and run a start-up test.
Hardware / Software Resources utilized
- An SB6 node with WISER platform connected to it.
- wiser_sb6_zedboard.ndz: disk image.
Set up
- To get started first make a reservation on the Orbit Scheduler for using the SB6.
- After logging into SB6 console, image one of the nodes
omf load -i wiser_sb6_zedboard.ndz -t node1-1
- Once imaging is done, turn the node on
omf tell -a on -t node1-1
- Wait for the node to turn on and log in
ssh root@node1-1
Loading the Zedboard
Launch XMD
root@node1-1:~# xmd
Xilinx Microprocessor Debugger (XMD) Engine
Xilinx EDK 14.7 Build EDK_P.20131013
Copyright (c) 1995-2012 Xilinx, Inc.  All rights reserved.

XMD%
To program the Zedboard, use the script zedboard_load.tcl
XMD% source zedboard_load.tcl
bit file - cr_top_spec_sense_rx.bit
elf file - eth_fmcomms_spec_sense.elf
Programming Bitstream -- cr_top_spec_sense_rx.bit
Fpga Programming Progress ............10.........20.........30.........40.......                                                                                                                                                             ..50.........60.........70.........80.........90........Done
Successfully downloaded bit file.

JTAG chain configuration
--------------------------------------------------
Device   ID Code        IR Length    Part Name
 1       4ba00477           4        Cortex-A9
 2       03727093           6        XC7Z020


JTAG chain configuration
--------------------------------------------------
Device   ID Code        IR Length    Part Name
 1       4ba00477           4        Cortex-A9
 2       03727093           6        XC7Z020

--------------------------------------------------
Enabling extended memory access checks for Zynq.
Writes to reserved memory are not permitted and reads return 0.
To disable this feature, run "debugconfig -memory_access_check disable".

--------------------------------------------------

CortexA9 Processor Configuration
-------------------------------------
Version.............................0x00000003
User ID.............................0x00000000
No of PC Breakpoints................6
No of Addr/Data Watchpoints.........4

Connected to "arm" target. id = 64
Starting GDB server for "arm" target (id = 64) at TCP port no 1234
Downloading Program -- eth_fmcomms_spec_sense.elf
        section, .text: 0x00100000-0x0011faa7
        section, .init: 0x0011faa8-0x0011fabf
        section, .fini: 0x0011fac0-0x0011fad7
        section, .rodata: 0x0011fad8-0x00120df7
        section, .data: 0x00120df8-0x00121c37
        section, .eh_frame: 0x00121c38-0x00121c3b
        section, .mmu_tbl: 0x00124000-0x00127fff
        section, .ARM.exidx: 0x00128000-0x00128007
        section, .init_array: 0x00128008-0x0012800f
        section, .fini_array: 0x00128010-0x00128013
        section, .bss: 0x00128018-0x0012879b
        section, .heap: 0x0012879c-0x0012a79f
        section, .stack: 0x0012a7a0-0x0012fb9f
Download Progress..10.20.30.40.50.60.70.80.90.Done
Setting PC with Program Start Address 0x00100000
XMD%
Open another terminal and run the startdhcp shell script, which configures the Ethernet interface to Zedboard, and starts DHCP server on the node.
root@node1-2:~# ./startdhcp.sh
 * Starting ISC DHCP server dhcpd                                        [ OK ]
root@node1-2:~#
Launch minicom to display serial data sent by the Zedboard.
root@node1-2:~# minicom

Welcome to minicom 2.7

OPTIONS: I18n
Compiled on Jan  1 2014, 17:13:19.
Port /dev/ttyACM0, 12:30:47

Press CTRL-A Z for help on special keys
Running a start up test
At the XMD prompt, start the processor by typing "con"
XMD% con
Processor started. Type "stop" to stop processor

RUNNING> XMD%
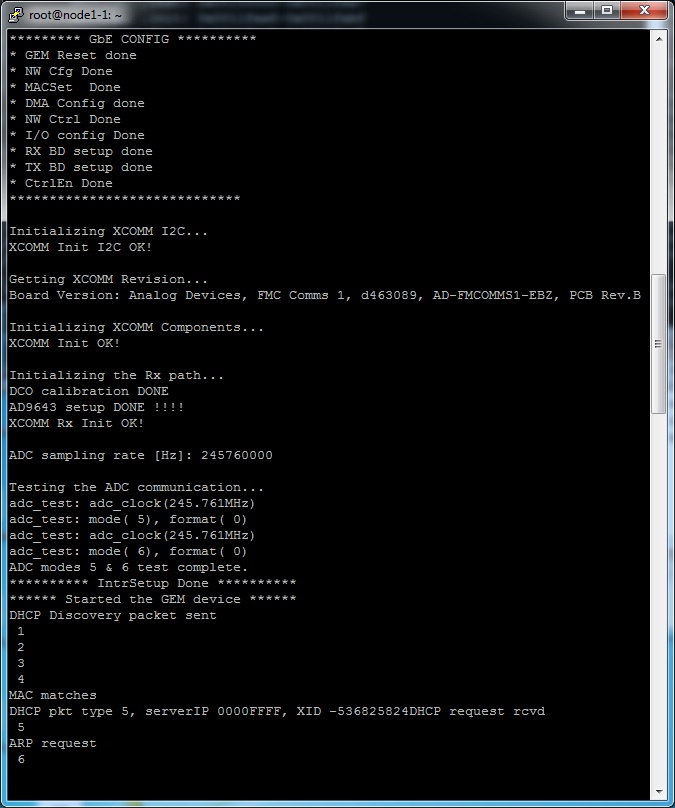
The following would be printed out in the minicom window.

|
Last modified
10 years ago
Last modified on Sep 11, 2015, 6:25:07 PM
Attachments (1)
- minicom_screen.jpg (115.3 KB ) - added by 10 years ago.
Download all attachments as: .zip
Note:
See TracWiki
for help on using the wiki.
